

VTuber Quick Start
- Aug 1, 2025
- 7 min read
Updated: Aug 27, 2025
This guide is a newbie-friendly walkthrough for getting set up in Vtube Studio! Further on, you'll find more in-depth information about widgets, plugins, and perfecting your facial tracking. For now, let's just get your new vtuber loaded up and ready to use.
This tutorial series is both Mac and PC compatible, and all required software is completely free! I've written this as a guide for clients of my vtuber commissions, but I hope anyone who takes a look can get some use out of it!
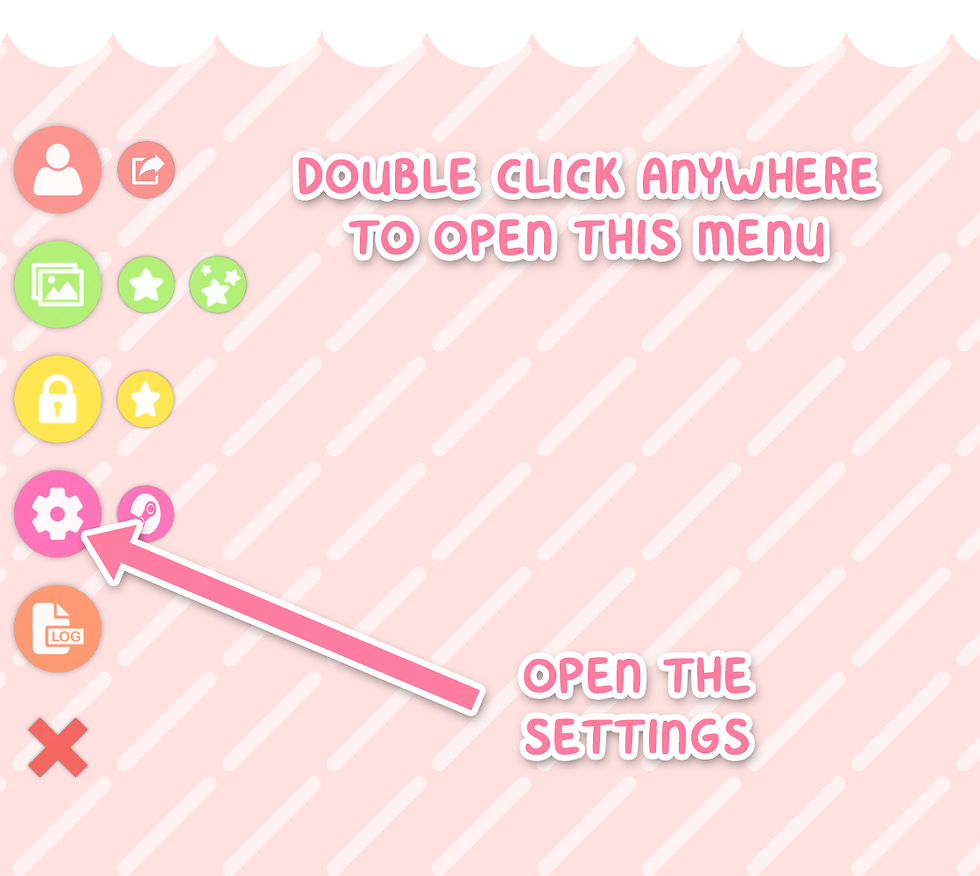
If you're brand new to Vtube Studio, first have a look at my Newbie Glossary for some helpful terms and a quick rundown of the VTS menus.
Jump To:
Step 1: Download Files and Software
Download your [CharacterName].zip folder supplied by your rigger.
My clients can find this in the File Delivery section on vGen
Download Vtube Studio (free) from Steam.
(Optional) Download the Vtube Studio mobile app if you plan on using an iOS device instead of a webcam.
(Optional) Download Vbridger ($10 USD) from Steam for enhanced facial tracking. Requires iOS camera.
Step 2: Import Your Model into VTS
Extract the [CharacterName].zip file to get your /Character root folder.
Locate the /Live2DModels data folder and place your /Character folder inside.
You can quickly access the data folder by opening Vtube Studio and going into the Settings menu. In the General tab, clicking the "Open Data Folder" button will open up a finder/explorer window for you.
This folder is where you can add your own custom items, backgrounds and models. For now, we'll just open the /Live2DModels folder and drag our Character folder into there.
From the VTS main menu, open the Model menu and select your character from the list (may require refreshing).
Check my Newbie Glossary for help navigating the VTS menus


Step 3: Connect Your Camera
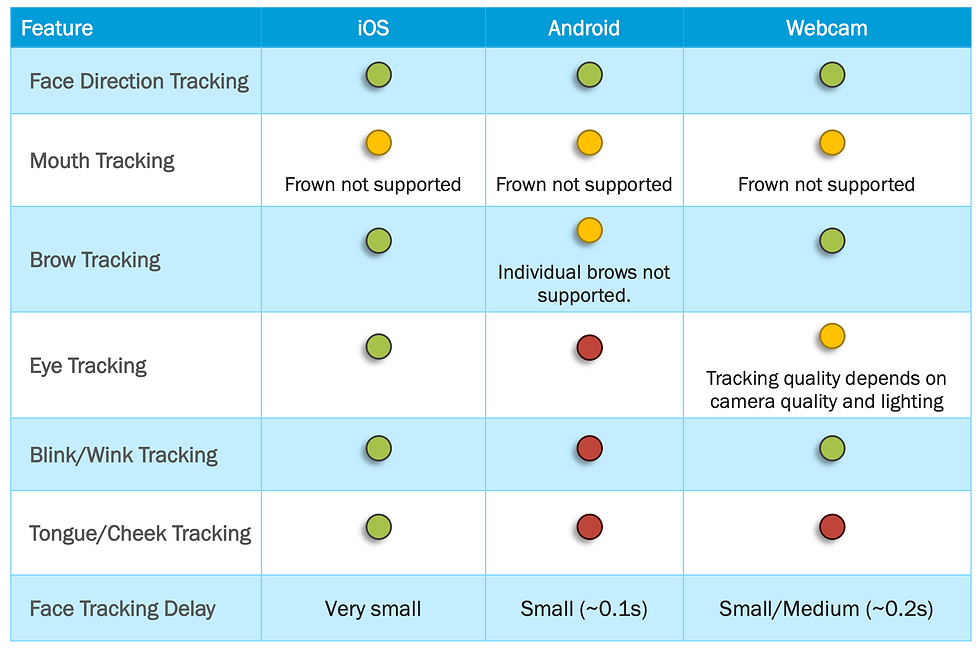
Webcam vs iOS?
iOS offers faster and more accurate tracking, but requires an iDevice with a FaceID camera and a $15 USD Vtube Studio license for unlimited streaming.
The standard mouth options included in my commissions (3x3 for Squishes and 5x5 for Waist Ups) are perfectly compatible with webcam tracking, which is a free and easy way to get started. An iOS camera is only required for optional add-ons like VBridger tracking, Tongue Out, and Cheek Puff.
Alternatively, PC users with an RTX graphics card can download the free NVIDIA Broadcast DLC for improved webcam tracking and VBridger support.
WEBCAM USERS:
Open the Camera tab in the Settings menu.
Click "Choose Camera" to set up your webcam. Stick to the highest resolution and frame rate available for your camera. You can always change these details later.
Be sure to click CAMERA ON to start tracking, then click the Configure button that pops up to calibrate your face in a neutral position.
iOS USERS:
On both your PC and iOS device, open the General tab in the Settings menu.
USB Connection:
Find the "USB Settings" section and enable the Connect USB toggle on both devices.
Ensure your computer "Trusts" your device when plugged in.
WiFi Connection:
On PC, find the "Connection Settings" section and click the Show IP List button. Copy down one of the IPv4 numbers.
On iOS, find the "Stream to PC (WiFi)" section and type your IPv4 number into the IP field. Ensure the Port Number also matches on both devices.
On PC, enable Start Server.
On iOS, enable Connect to PC.
Calibrate the camera in Vtube Studio on your iDevice. Open the main menu and click the crosshair button next to the camera.

Notes about WiFi
Using the VBridger plugin requires the WiFi connection!
Your PC and iOS device need to be connected to the same network.
Tracking will drain your device's battery as well as increase the temperature. Keep it on charge and well ventilated while in use.
If you have a slow or unstable internet service, opting for a USB connection will make tracking much smoother.
Step 4: Customise Your Hotkeys
Even if you haven't commissioned any custom expressions for your model, it's worth familiarising yourself with the Hotkey menu! Here you can use the Expression Editor to create your own expressions, simply by enabling and disabling different parameters.
If your commission came with expressions, animations, outfits or props, you'll find them already set up in the Hotkey menu. All you need to do is assign a hotkey to them so they can be toggled.
Open the Hotkey tab in the Settings menu.
Enable Use Keyboard Hotkeys if you want to be able to trigger anything with keystrokes
Assign a hotkey to each expression in the list by recording your keystrokes in the Key Combination section.
It's best to combine any keystroke with a modifier key, like CTRL or SHIFT to avoid accidentally toggling anything.

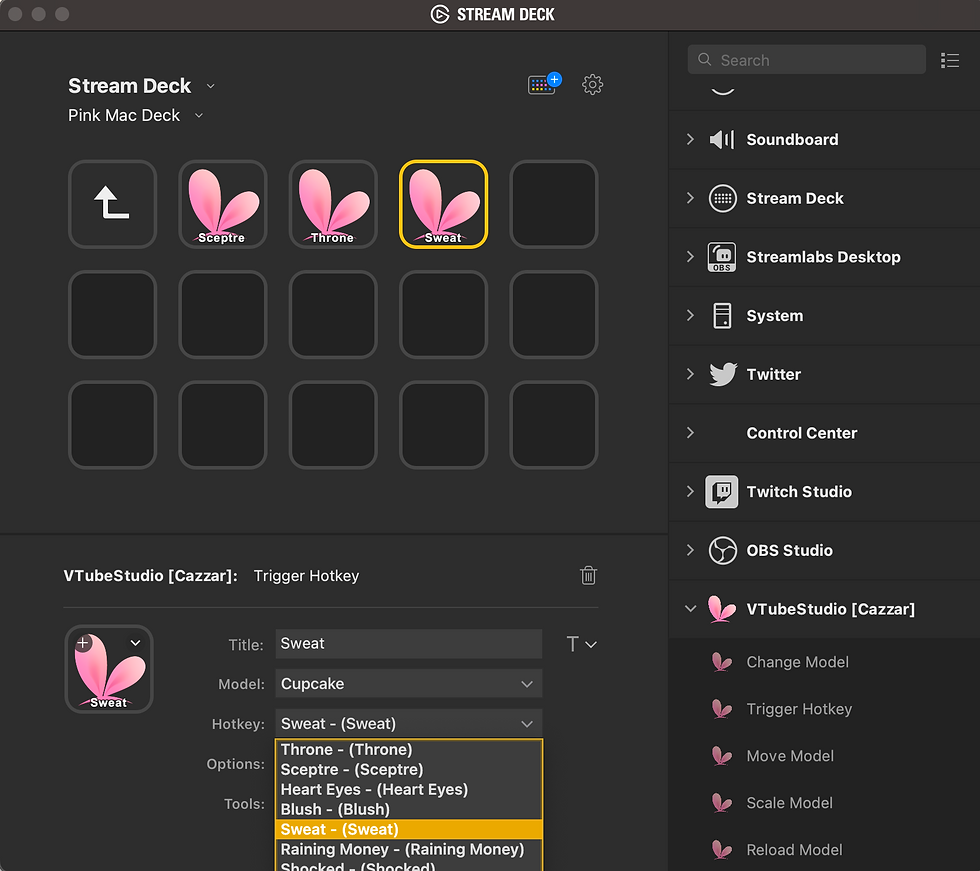
If you're using an Elgato Stream Deck, there's no need to worry about key combinations at all!
Install the Vtube Studio Plugin for Stream Deck.
Create a new "Trigger Hotkey" icon from the Vtube Studio list.
Select your model and the desired hotkey from the drop down menu.
Step 5: Capture in OBS
(Quick note: Are you setting up a Handtuber? Make sure you calibrate your hand before setting up in OBS!)
Recommended: Capture Plugins
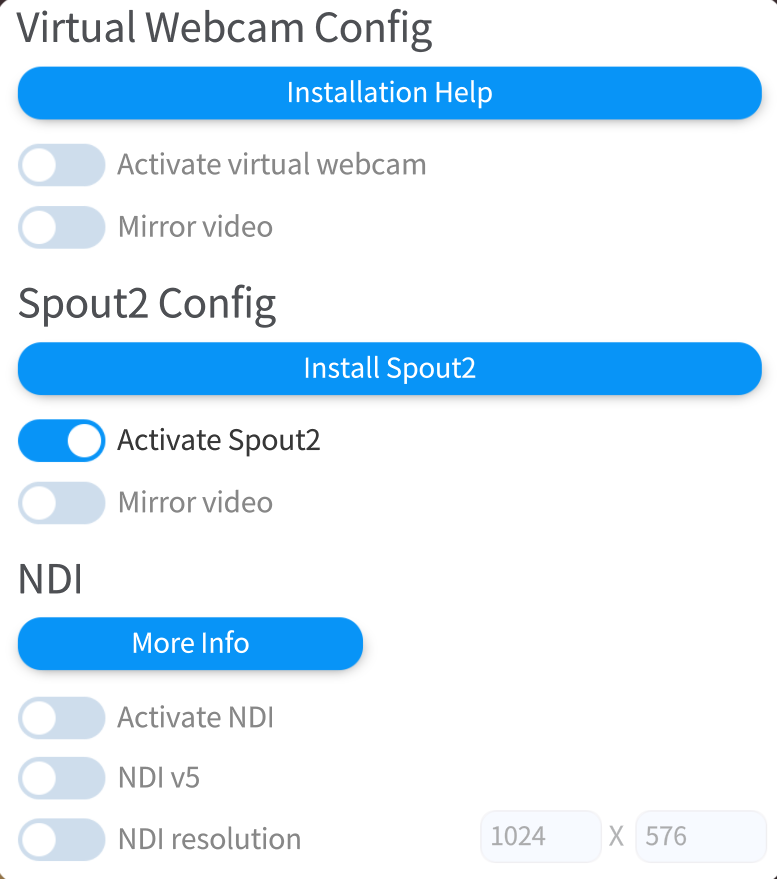
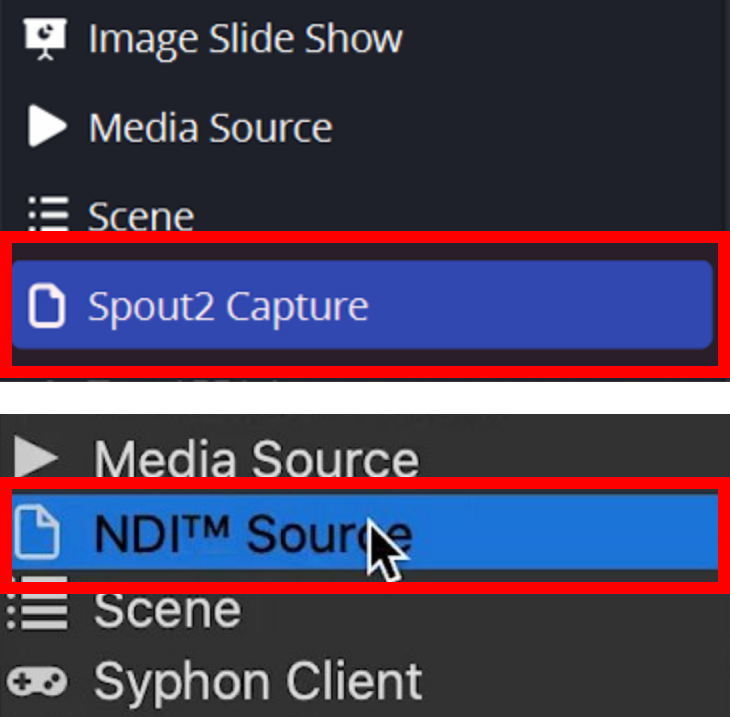
Whilst Game Capture technically works with VTS, Spout2 (Windows only) and NDI (Windows & Mac) sources are the most CPU/GPU efficient ways to capture a Vtuber with transparency.
Download the Spout2 plugin (Win), OR the NDI plugin (Mac) and install the plugin using the .exe or .pkg.
In VTube Studio, open the Camera tab in the Settings menu.
Scroll down to enable Activate Spout2 or Activate NDI.
In OBS, create a new Spout2 Capture or NDI™ Source source.
Select the VTube Studio window in the source properties if it hasn't automatically done so.
Alternative: Game/Window Capture
If for whatever reason you can't use one of the above plugins, a Game Capture source (Windows only) can capture Vtube Studio with a transparent background.
Mac users will have to use a Window Capture source, with a Chroma Key filter to remove the background.
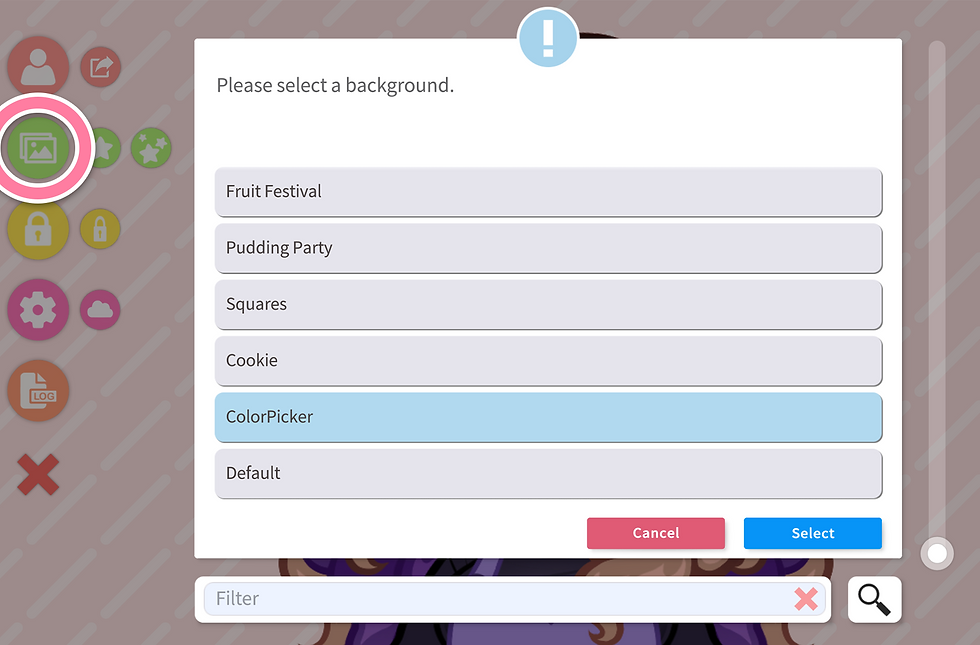
From the VTS main menu, open the Background Image option.
Scroll down to ColorPicker.
Set the background colour to green and enable the Transparent In Capture toggle.
If you have green in your model that will be keyed out, so pick another stark, saturated colour that doesn't appear on your model.
In OBS, make a new Window Capture source for Vtube Studio.
Windows users using Game Capture can stop here!
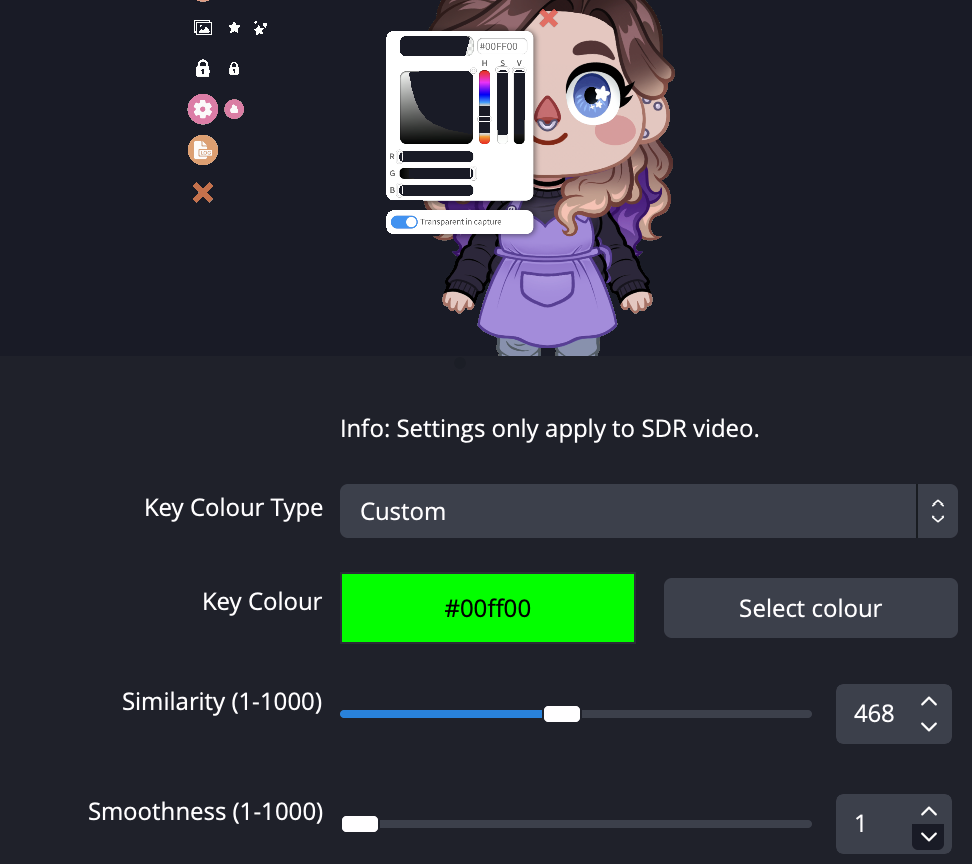
Right click this new source to open the Filters window, and create a new Chroma Key filter.
For best results, select the custom colour option and copy over the exact hex code from the colour you chose in VTS.
Adjust the Smoothness and Similarity sliders to fine tune the transparency.

Optional Step: Calibrate Handtuber
If your model is one of my custom Hand Cursors, you need to get the model scaled and lined up with your monitor before loading it into OBS.
Set Monitor Range
Maximise the Vtube Studio window on the monitor you want to capture.
Open the General tab of the Settings menu, and scroll down to the Mouse Input Config section.
Position your cursor at the very top left edge of your desired screen, and copy the X and Y values into the minimum X and Y fields.
Position your cursor at the very bottom right edge of your desired screen, and copy the X and Y values into the maximum X and Y fields.

Line Up Your Model
Close out of all menus, and make sure your model is unlocked so you can move and scale it.
Click and drag until the tip of the cursor (pen, fingertip etc) is lined up with your mouse. This will be roughly in the middle of the screen.

Move your mouse left and right to check that the cursor stays aligned with your mouse.
If it moves too quickly or too slowly, you'll need to scale it up or down with the scroll wheel on your mouse.


(Optional) Lock the model's position using the yellow padlock button in the main menu
Open the Hotkeys tab of the Settings menu and find the "RESET" hotkey I've already set up for you.
Click the "Record Position" button to save the model's position, so you can simply trigger this hotkey if you ever need to reset it back into place!
Now that your Handtuber is aligned, you can minimise or shrink Vtube Studio however you need. Just make sure the window stays in the same ratio (16:9 etc) as your monitor.
Capture In OBS
If you want to run your Handtuber alongside another model, you can open it in a second Vtube Studio window and capture both of them as two different OBS sources.
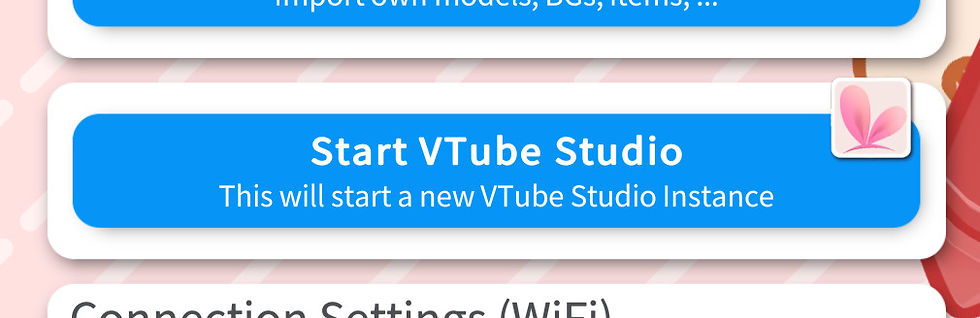
Go to the General Settings menu and click the "Start VTube Studio" button, then load your Handtuber in the second window that opens.
Not all VTS plugins and chatbots will be able to connect to two VTube Studio windows at once, so run a test stream to check whether your chat will be able to redeem hotkeys for your Handtuber.
Capture the Handtuber VTS window in OBS, as described here.
Capture your monitor using a Display Capture Source. In the source properties, disable your cursor's visibility.
Resize both windows in OBS with CTRL/CMD + F.
With both sources now aligned, you can group them together and apply any transforms (crop, resize, etc) to the folder, to keep them lined up.
You're all ready to stream!
That's everything you need to jumpstart your new rig, but there's plenty more we can do to make the most of your model. Read on to learn about fine-tuning your facial tracking, additional VBridger settings, integrating Twitch bots, channel points, and loads more fun to be had.
Leave a comment or message me on Bluesky if you have questions, and don't forget to check out my vtuber commissions if you're new here and want to see some cool rigs in action!
What Next?
Once you've gotten the hang of piloting your rig, there's loads of fun to be had with add-ons and stream integrations! Find my complete range of vtuber guides here!


Comments